Accessing a Private ROSA Hosted Control Plane (HCP) Cluster with an AWS Network Load Balancer
Overview
This document provides guidance on using a public AWS Network Load Balancer (NLB) to connect to a private Red Hat OpenShift on AWS (ROSA) Hosted Control Plane (HCP) cluster. When the cluster is private and lacks direct public IP access, the NLB facilitates secure and reliable routing of traffic from public sources to the private cluster by exposing a stable endpoint while maintaining network isolation. This setup ensures that the private cluster can effectively handle external traffic, such as requests from APIs or services, without directly exposing sensitive internal infrastructure to the Internet.
The end-to-end traffic flow is:
Client (Internet)
  → DNS (api.example.com)
  → Internet-facing NLB (TLS:443, ACM certificate for api.example.com)
  → Target group (IP addresses, TLS:443)
  → Private IPs of ROSA HCP VPC endpoint ENIs
  → Cluster Kubernetes API
Pre-requisites
A private ROSA HCP cluster already running (4.20+) (see the Deploying ROSA HCP documentation ).
In this example, we will use Entra ID as the external authentication for ROSA HCP cluster (see Configuring Microsoft Entra ID as an external authentication provider )
(Optional) Launch a Jump Host EC2 instance in Public NLB VPC This guide requires connectivity to the cluster. Since we are using a private cluster you must ensure that your workstation is connected to the AWS VPC hosting the ROSA cluster. If you already have this connectivity through a VPN, Direct Connect or other method you can skip this section. If you do need to establish connectivity to the cluster these instructions will guide you through creating a jump host and connect to the ROSA HCP cluster.
A public domain you control (for example example.com) with a Route 53 public hosted zone in the same AWS account
Create a security group, a target group and network load balancer in your AWS account
Once the ROSA HCP cluster is installed with external authentication using Entra ID we need to set up an additional security group to grant access outside the VPC, as well as create target group and a NLB.
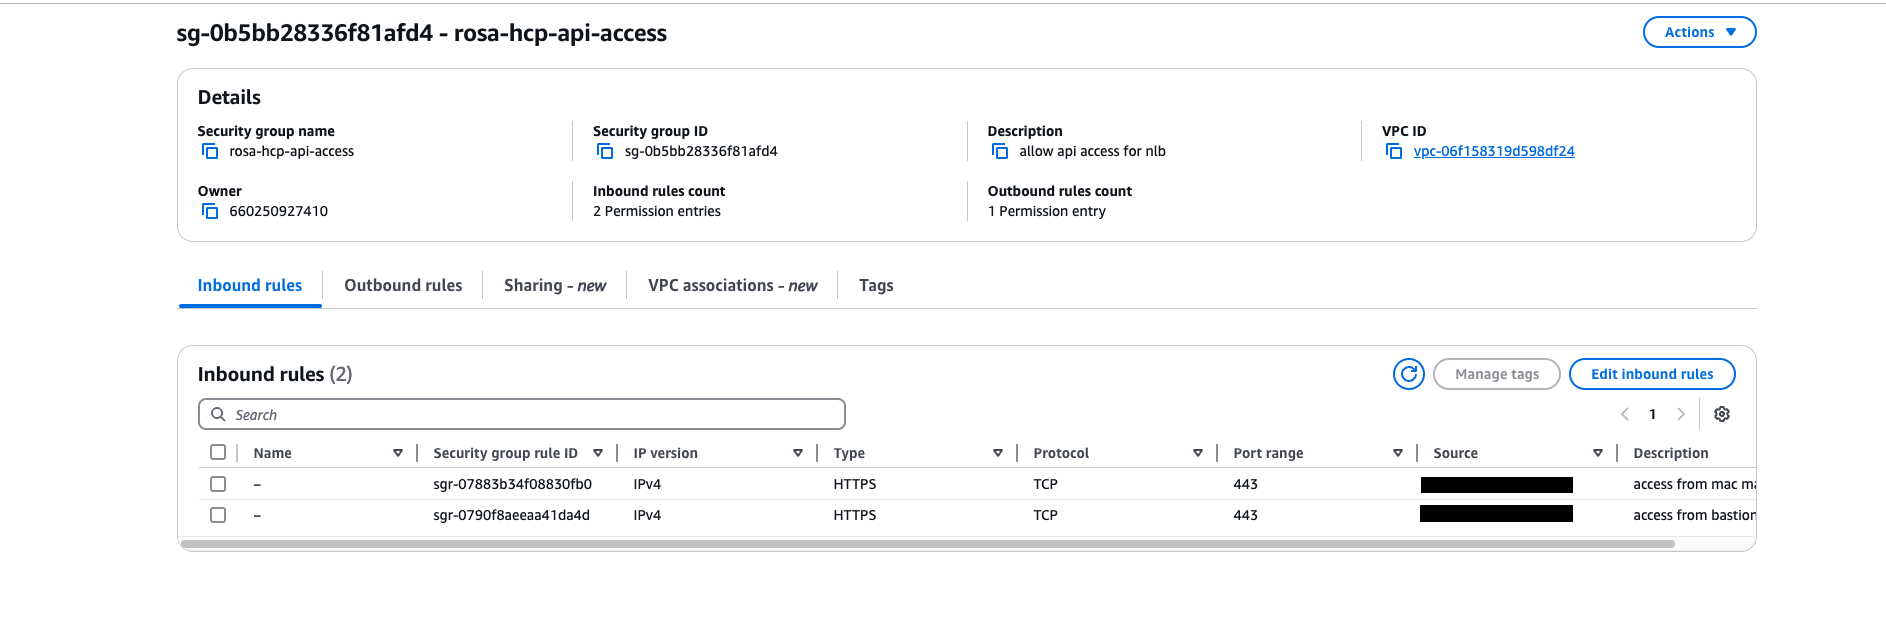
Create a Security Group for NLB:
Navigate to the Security Groups section in the AWS console click on Create security group.
- Name tag: Give your security group a name. Select the VPC in which your Network Load Balancer is in.Click Create.
- Modify Inbound rules Select the newly created security group from the list. Navigate to the Inbound rules tab and click Edit Inbound rules. Add a new inbound rule with the following settings:
- Type: Choose the appropriate protocol for your NLB (e.g., HTTP, HTTPS, or TCP, depending on the service you’re exposing).
- Protocol: Choose the protocol for your NLB (TCP is commonly used for NLBs).
- Port Range: Specify the port on which your NLB is listening on (e.g., 80 for HTTP, 443 for HTTPS).
- Source:
- Choose My IP to allow access from your current IP address.
- Alternatively, specify a custom IP range in CIDR format (e.g.,
192.x.x.x/24for a specific subnet).
example output from the AWS console :
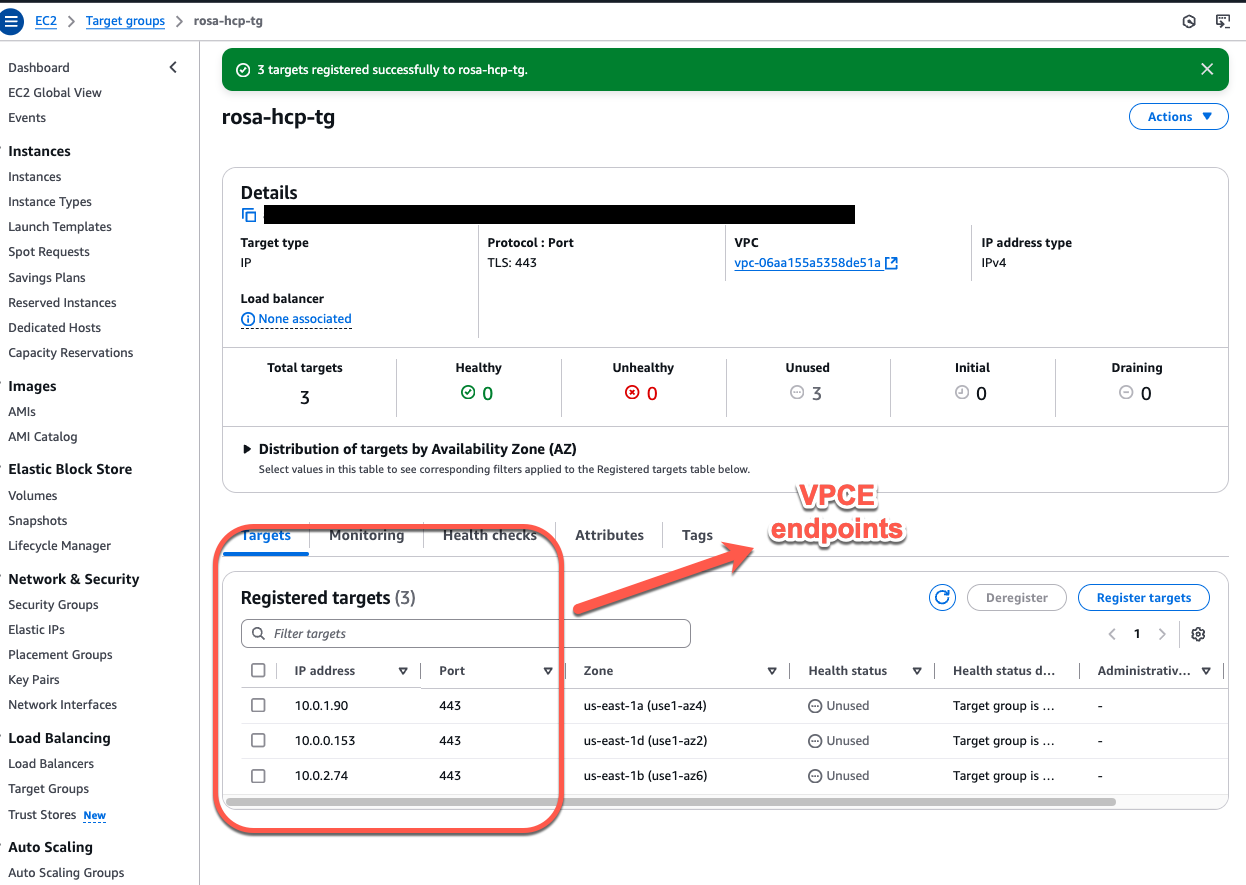
Create a target group with VPC Endpoints as targets
Define the target group with a list of VPC endpoints IPs that an NLB can access based on configured rules and health checks; allowing for load balancing across multiple instances within the group.
Here is a step-by-step guide for creating a target group in AWS for your network load balancer:
Create a Target Group:
- Navigate to the Target Groups section in the AWS console and click Create target group.
- Target type: Select IP addresses if you’re using IP-based routing (common for VPCEs or EC2 instances located in private subnets).
- Protocol: Choose TLS to secure your communication.
- Port: Set the Port to 443, which is the standard port for secure HTTPS/TLS traffic.
- VPC: Choose the VPC where your targets for ROSA HCP VPCEs are located.
Configure Health Checks:
- Health check protocol: Set to TCP to verify that the backend targets are healthy and accepting connections.
- Health check port: Set to 443, which matches the port your targets will use for traffic.
- Health check path: Leave this field empty or specify path (e.g.,
/health) if you want to perform HTTP/HTTPS health checks. - Optionally adjust other health check settings (e.g., threshold, interval) according to your requirements.
Add Targets:
- IP addresses: Enter the IP addresses of the targets that should be included in this target group. You might enter the IPs of VPCEs that you want the load balancer to route traffic to private HCP cluster.
- Click Include as pending below to add these targets to the group.
Create the Target Group:
- After verifying all your settings, click Create target group to complete the setup of your target group.
Once created, you can associate this target group with your NLB listener to route traffic to the ROSA HCP cluster.
example output from the AWS console :
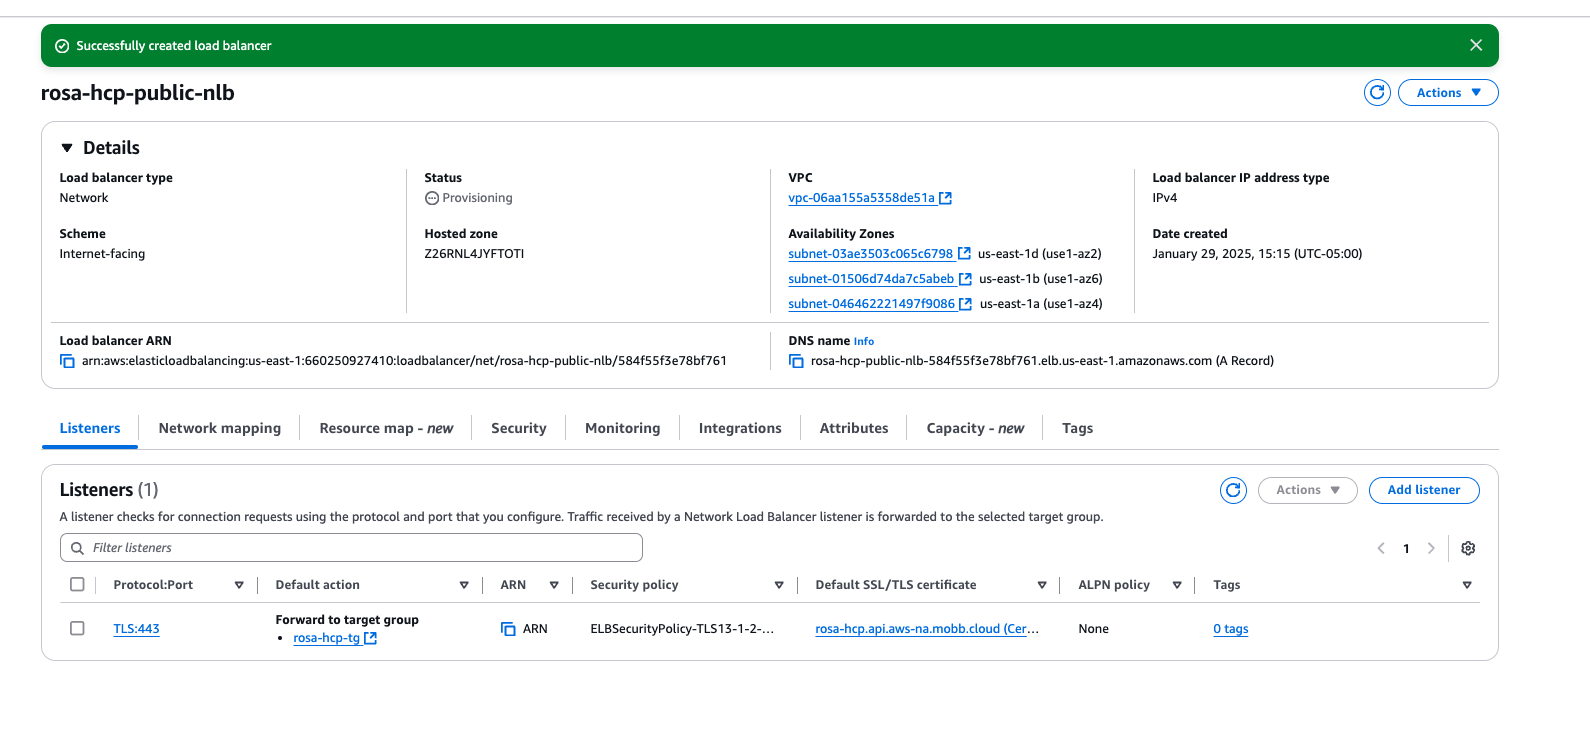
Create and configure the public NLB
Here is a step-by-step guide for creating a Network Load Balancer (NLB) and configuring it with your domain:
Create the NLB:
- Scheme: Choose Internet-facing. This option allows your NLB to be accessible from the internet.
- VPC: Select the VPC. This can be
- Security Groups: Select a security group that allows access to your API from your IP address. This should be configured to allow inbound traffic on the port you’ll be using (usually port 443 for secure communication).
Configure Listeners and Routing:
- Protocol: Set the Protocol to TLS, to secure communication.
- Port: Set the Port to 443, which is the standard port for HTTPS traffic.
- Target Group: Choose the target group you created earlier. This will route the incoming traffic to the appropriate targets.
Secure Listener Settings (Optional but recommended for HTTPS):
Certificate (from AWS Certificate Manager (ACM)):
- Select or create a new certificate using AWS ACM.
- This certificate should be for the domain name you plan to use for your externally facing API. For example, if your API will be accessible at
api.example.com, ensure the certificate matches that domain.
Leave other settings at their default values unless specific changes are needed.
Create the Load Balancer**:
- After configuring all the settings, click Create load balancer to finalize the setup of your Network Load Balancer.
Update Route 53:
- Create a Record: In Amazon Route 53, create a new DNS record that points to the NLB’s DNS name.
- The record should match the domain name for which the ACM certificate was issued (e.g.,
api.example.com). - Use the Alias record type to point to the NLB. AWS provides the DNS name of your NLB, which you can directly map to the record.
- The record should match the domain name for which the ACM certificate was issued (e.g.,
- Create a Record: In Amazon Route 53, create a new DNS record that points to the NLB’s DNS name.
This configuration will ensure that traffic is securely routed from the internet to your API, leveraging the NLB to distribute traffic to your backend resources.
example output from the AWS console :
Validate the connection to the NLB
Validate that you can access the NLB from your machine using nlb domain name. For example nlb-domain-name=https://api.example.com
curl https://api.example.com/version
example output:
[ec2-user@ipaddress ~]$ curl -v https://api.example.com/version
{
  "major": "1",
  "minor": "28",
  "gitVersion": "v1.28.15+ff493be",
  "gitCommit": "4abcdefgchijklms",
  "gitTreeState": "clean",
  "buildDate": "2024-11-23T03:11:13Z",
  "goVersion": "go1.20.12 X:strictfipsruntime",
  "compiler": "gc",
  "platform": "linux/amd64"
}
Validate connection to ROSA HCP cluster’s API
export nlb-domain-name=https://api.example.com
create a KUBECONFIG file here with EntraID details for ROSA HCP cluster with external auth enabled .
example create rosa-auth.kubeconfig file with following information
apiVersion: v1
clusters:
- cluster:
    server: ${nlb-domain-name}:443
  name: cluster
contexts:
- context:
    cluster: cluster
    namespace: default
    user: oidc
  name: admin
current-context: admin
kind: Config
preferences: {}
users:
- name: oidc
  user:
    exec:
      apiVersion: client.authentication.k8s.io/v1
      args:
      - oidc-login
      - get-token
      - --oidc-issuer-url=https://login.microsoftonline.com/${TENANT_ID}/v2.0
      - --oidc-client-id=${CLIENT_ID}
      - --oidc-client-secret=${CLIENT_SECRET}
      - --oidc-extra-scope=email
      - --oidc-extra-scope=openid
      command: kubectl
      env: null
      interactiveMode: Never
Set the KUBECONFIG environment variable to the location of the rosa-cluster.kubeconfig file. This will configure the OpenShift CLI to authenticate against the ROSA cluster with the OIDC client.
export KUBECONFIG=$(pwd)/rosa-auth.kubeconfig
Confirm your access to the cluster by running the following command:
oc get nodes
example output:
NAME                         STATUS   ROLES    AGE     VERSION
ip-10-0-0-170.ec2.internal   Ready    worker   3h29m   v1.30.7
ip-10-0-1-171.ec2.internal   Ready    worker   3h30m   v1.30.7
ip-10-0-2-161.ec2.internal   Ready    worker   3h29m   v1.30.7
To verify you are logged in as user of the group, run the following command:
oc auth whoami
example output:
ATTRIBUTE   VALUE
Username    XXXXXXX@redhat.com
Groups      [0000000000000000 system:authenticated]